How to Make a Moving Pictogram GIF in AnimeEffects, Explained with Screenshots

How to Make a Moving Pictogram GIF in AnimeEffects, Explained with Screenshots

Written by

in

This article walks through splitting a pictogram into parts in PowerPoint, adding bones in AnimeEffects, and exporting a GIF. The example is a blue figure waving its left arm. The same approach works for a site icon that needs to stand out, or for a motion that is easier to show as a short loop than to explain in words or shoot as video.

The screenshots are AnimeEffects and Microsoft PowerPoint®. Trademarks are in the note at the end. These stills are from the original session. Menu names in a newer build can differ.

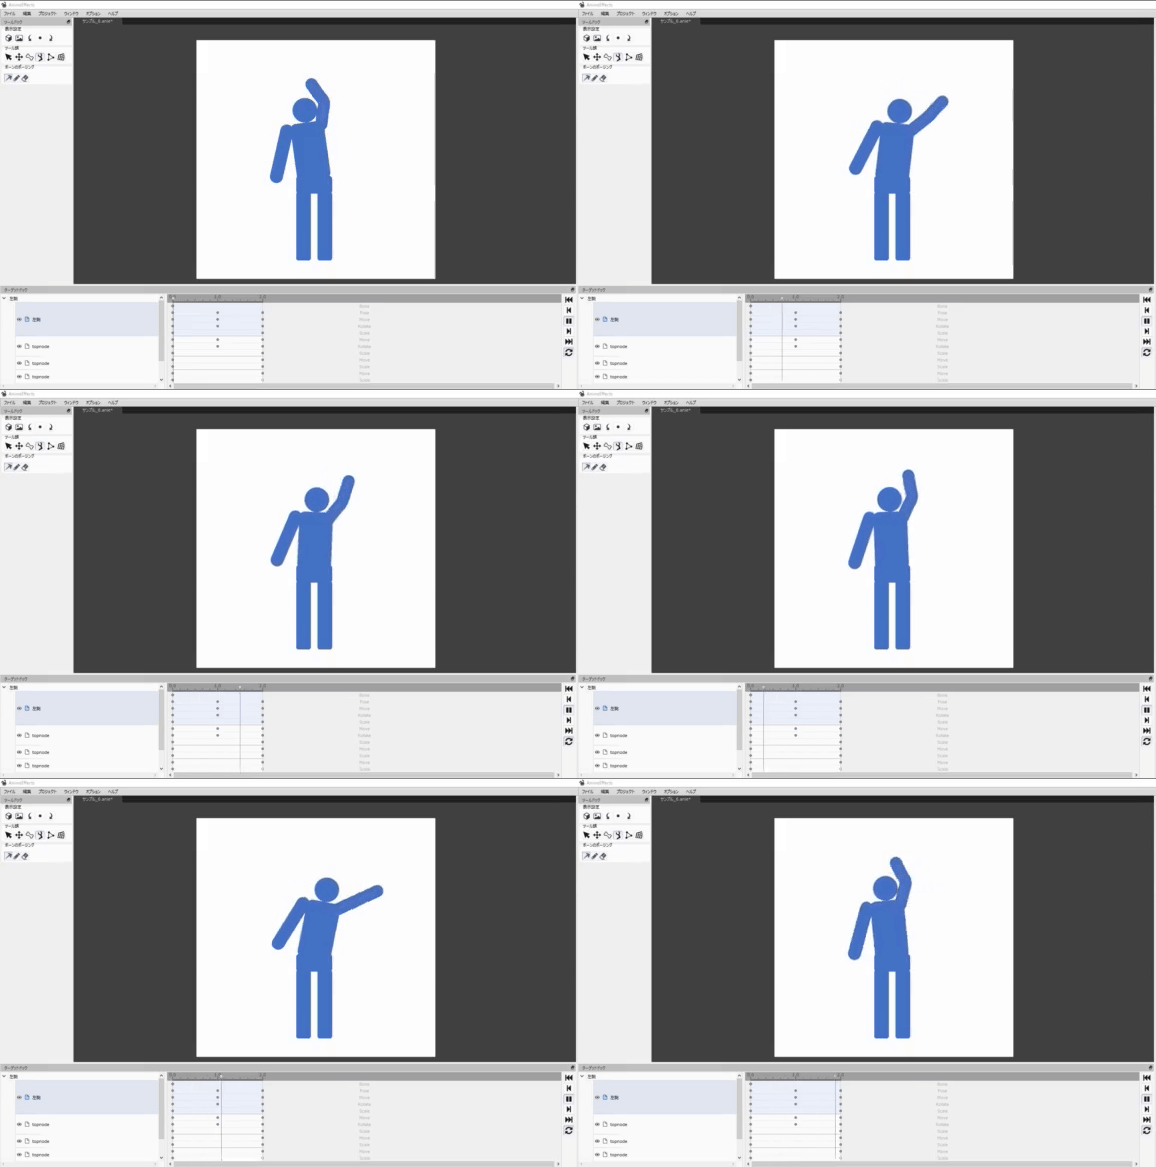
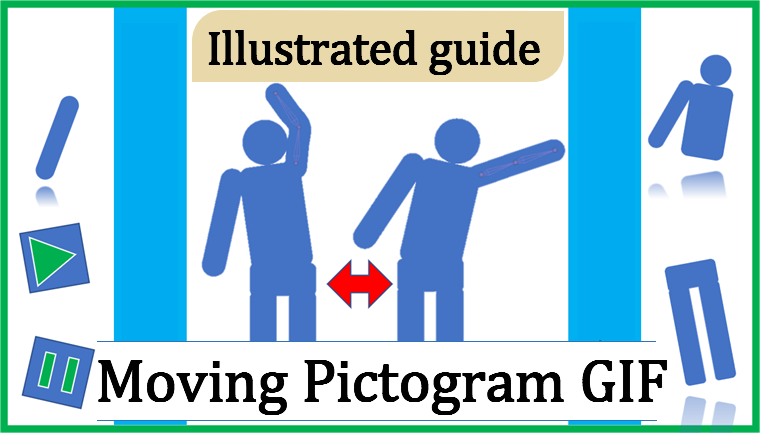
A finished waving pictogram, judged by the left arm swinging back and forth. It shows a bone-bent loop exported as a GIF. The figure repeats a raised-arm pose and a side-extended pose.
The finished loop. The left arm waves, then the GIF repeats

What this page covers

Jump toPoint
Source artSplit left-arm, torso, legs, and background into PNGs
InstallUnzip the official build. Current zips include FFmpeg
ProjectStart from left-arm, then add the rest in the Resource Window
ArrangeMove, rotate, scale into a figure, then set the start pose
BonesClick shoulder, elbow, wrist, set influence, then bend
WavePoses at 0 s and 1 s; copy the start to 2 s. Max frames 120
GIFExport As → GIF Animation. Turn on Optimize palette
If export failsGet a zip from FFmpeg.org and put it in tools next to the exe

Split the drawing into PNGs

Do not start from a single flattened drawing. Split at the joints that need to bend. This example uses four pieces: ① left arm, ② torso, ③ legs, ④ background. The background is a borderless white square.

These stills were drawn in PowerPoint. Any paint tool is fine if you already use one.
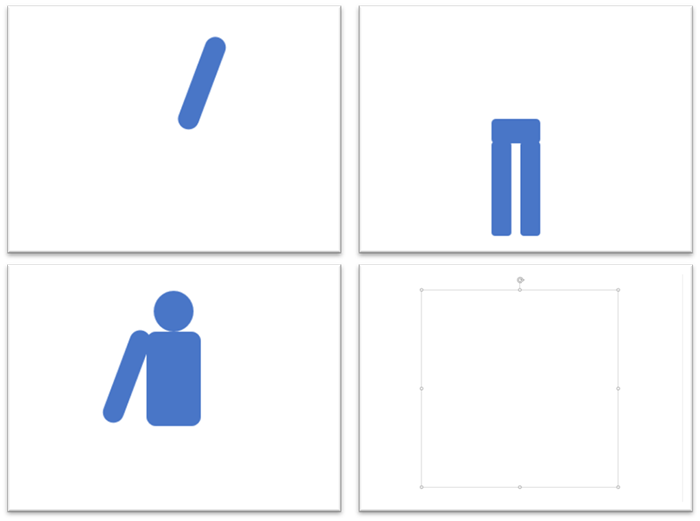
Pictogram parts, shown as four drawings: left arm, legs, torso, and background. It explains splitting at the joints that need to bend. The grid is a diagonal arm, a pair of legs, a headed torso, and a blank white square.
Draw the left arm, legs, torso, and background as separate pieces

Save each piece as a PNG. In PowerPoint, right-click the selection and choose Save as Picture.

⚠️ Common Pitfall

Torso and legs are several shapes. Save one shape and you get only a head, or a single leg. As in the GIF below, marquee the group first, then Save as Picture. The GIF still shows the Japanese PowerPoint menu.
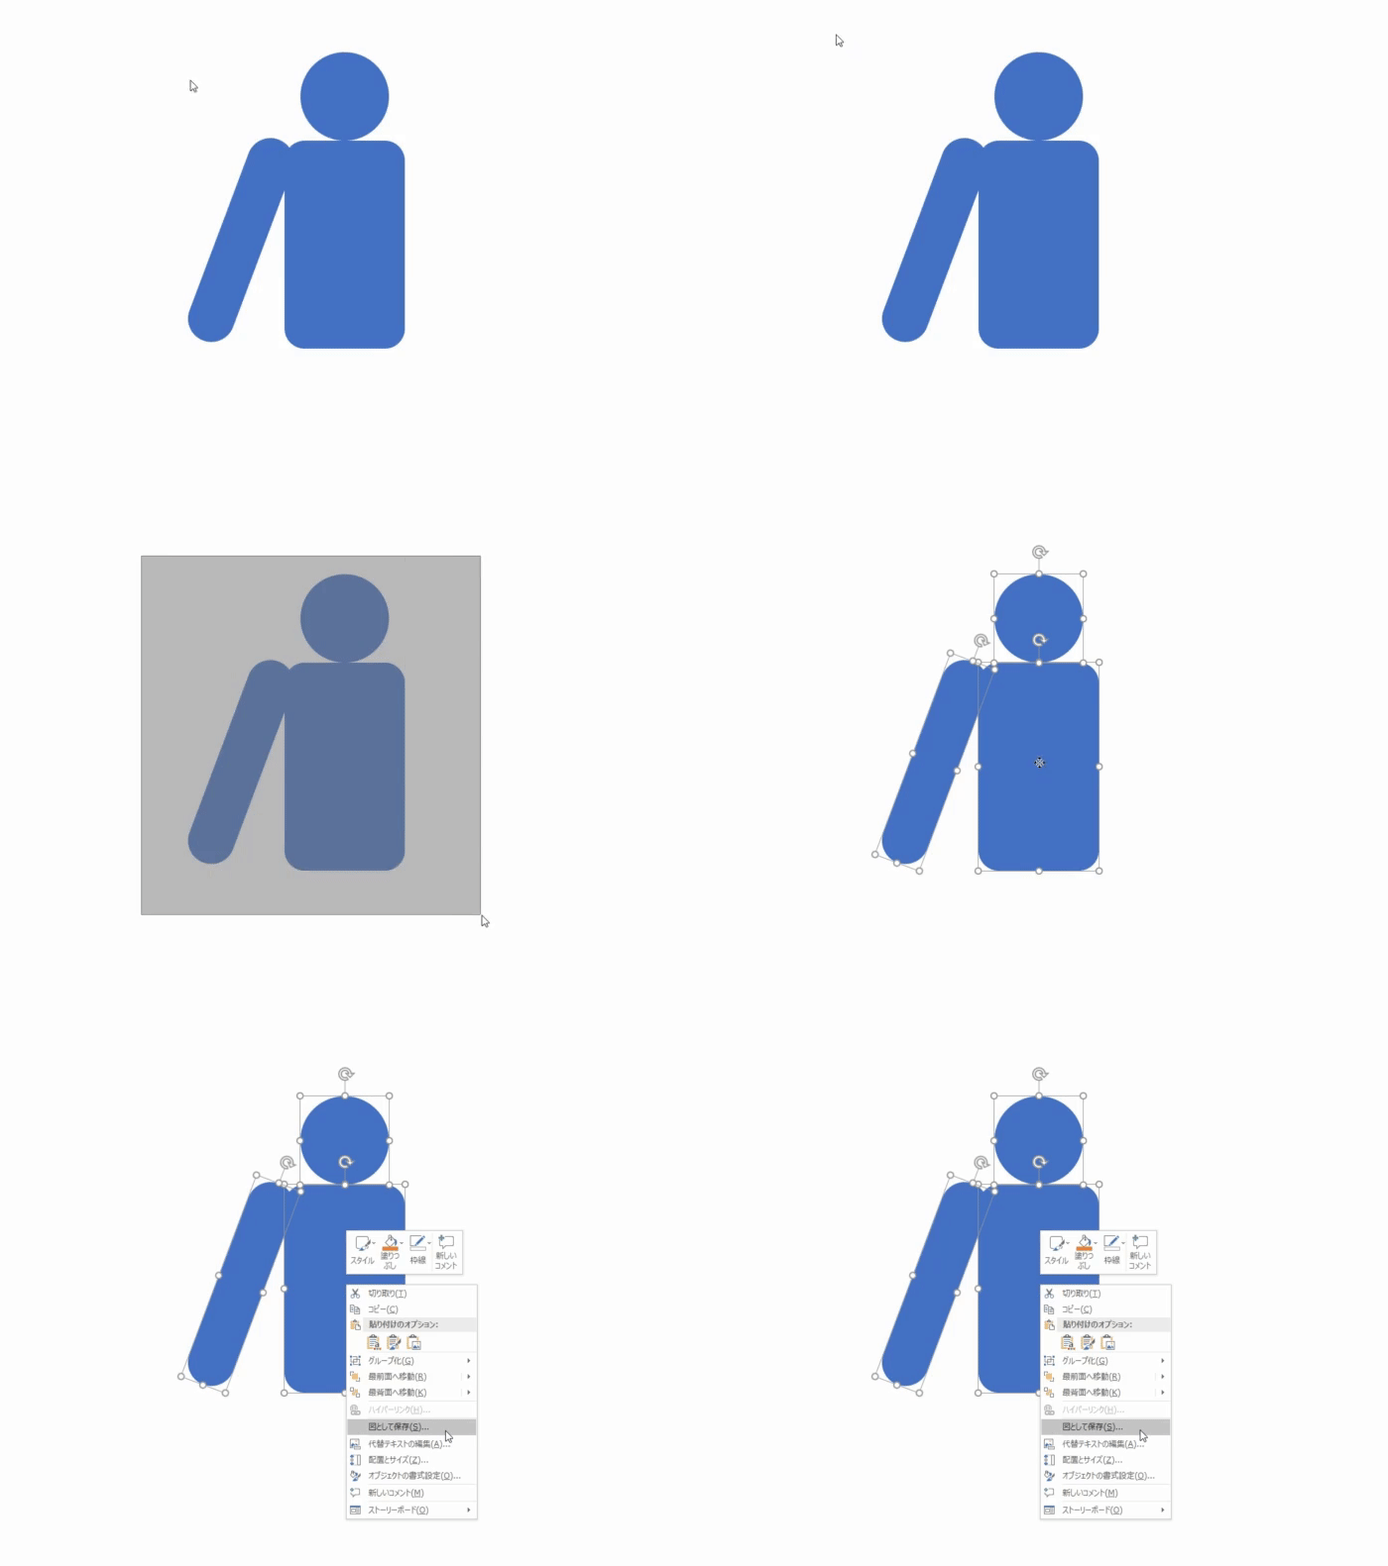
Saving grouped PowerPoint shapes as PNG, shown by a marquee then Save as Picture. It explains that a torso of several shapes must be selected together. The GIF follows a blue upper body being boxed and saved.
For a group of shapes, marquee them first, then Save as Picture
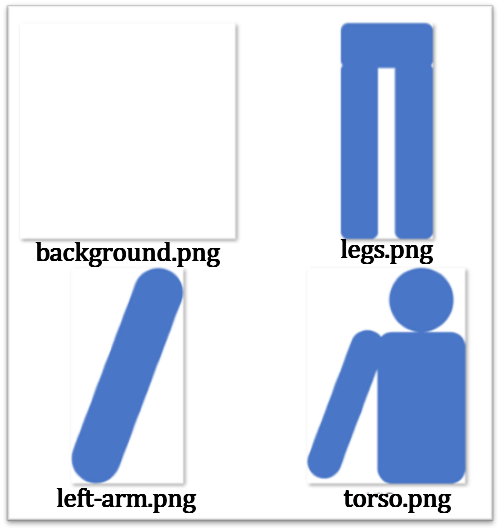
The four saved PNGs, shown by English filenames next to each part. It explains the files you pass into AnimeEffects. The panels are background.png, legs.png, left-arm.png, and torso.png.
left-arm.png, torso.png, legs.png, background.png

The names match the stills that follow: left-arm.png, torso.png, legs.png, background.png. Some original screenshots still show the Japanese filenames underneath the labels.

Install AnimeEffects

AnimeEffects puts bones on 2D images and moves them. The official Windows zip does not need an installer: unzip it and run AnimeEffects.exe. Mac and Linux zips exist too. These screenshots are Windows.

Get it from GitHub Releases. The walkthrough is on Downloads.

GIF and video export need FFmpeg. The current official zip already includes it, so you can keep going. If export succeeds, you do not need a separate download. If it fails, use the steps at the end and place a build from the FFmpeg site.

Jump to installing FFmpeg

Open a project and add the parts

Start AnimeEffects.exe. The canvas is empty at first.
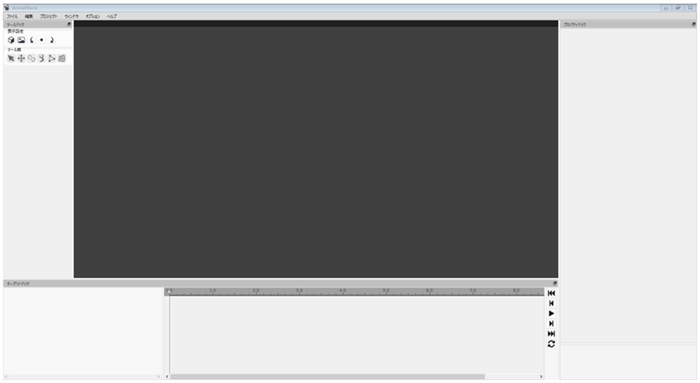
AnimeEffects just after launch, judged by an empty canvas and docks. It shows the window before you create a project. The center is dark, and the timeline and project dock are empty.
Just after launch. The canvas is still empty

From File, choose New Project. Set the initial resource to the left-arm.png you just saved. Check Specify canvas size, and set width and height to 1024.
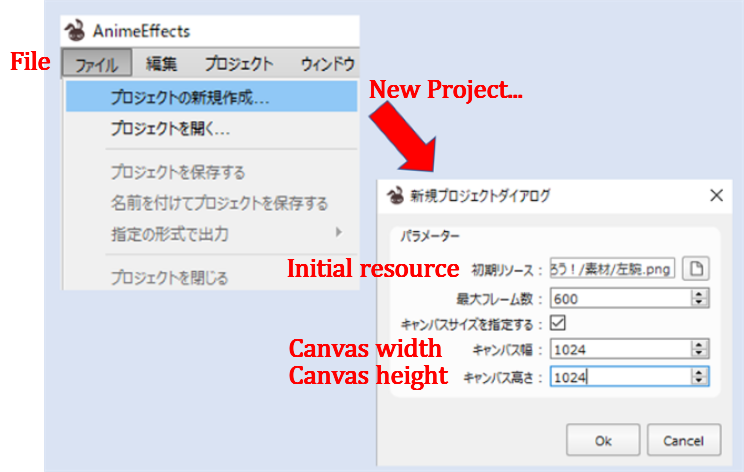
The New Project dialog, judged by initial resource and canvas size. It shows starting from left-arm.png at 1024 square. Specify canvas size is checked; width and height are 1024.
Initial resource: left-arm.png. Canvas 1024×1024

OK leaves only the left arm on the canvas.
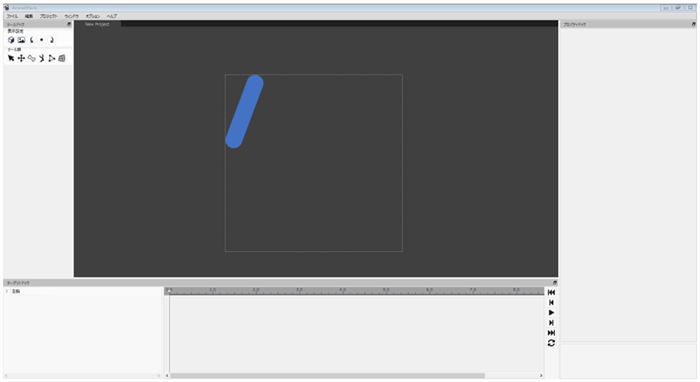
The canvas after New Project, judged by only the initial resource being placed. It shows that the other parts are not loaded yet. A blue diagonal left arm sits alone in a dashed square.
Right after New Project. Only the left arm is on the canvas

Add the rest from WindowResource WindowAdd Resources. Bring in torso, legs, and background the same way.
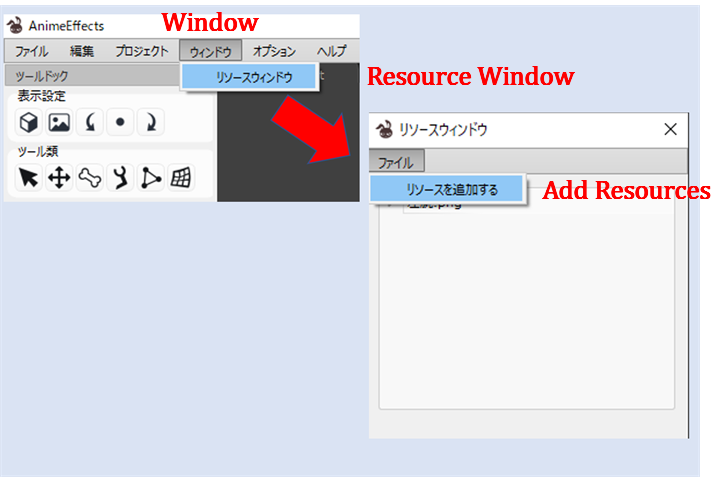
Adding resources, judged by Window, Resource Window, and Add Resources. It shows how the remaining PNGs enter the project. Resource Window is selected and Add Resources is open.
Window → Resource Window → Add Resources
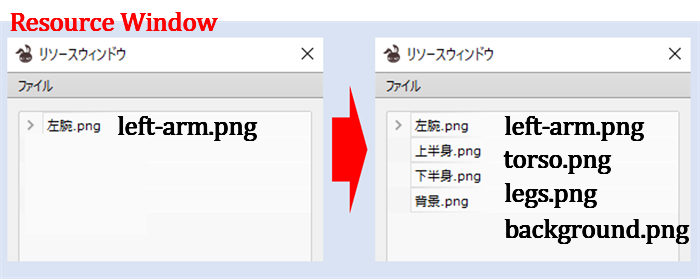
The Resource Window before and after, judged by the file list growing. It shows adding torso, legs, and background after left-arm. Left has one file; right lists four names.
After left-arm.png, add torso.png, legs.png, and background.png
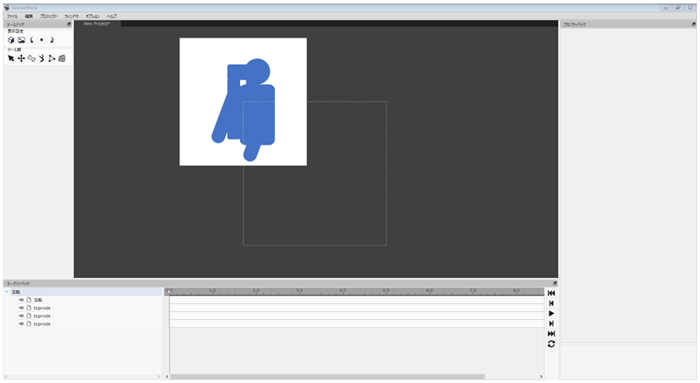
The canvas just after adding parts, judged by overlap and the target list. It shows that position and scale are not set yet. The blue figure sits in a white frame; the list includes topnode.
The parts are still stacked. Next you line them up

Arrange the parts and set the start pose

In the upper-left Toolbox, choose Move, rotate, scale. Switch parts in the Target Dock at the lower left, and arrange them into a person on the canvas. Match the sizes here too.
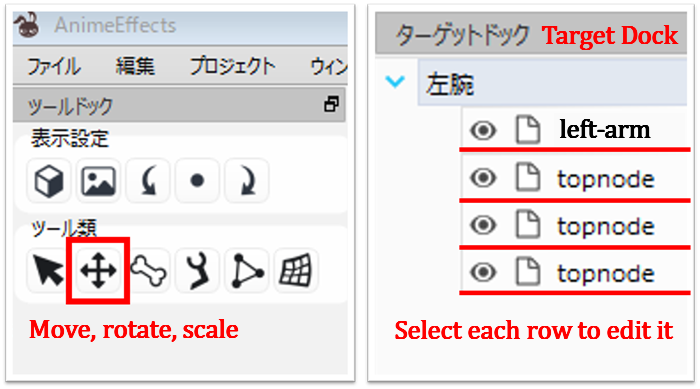
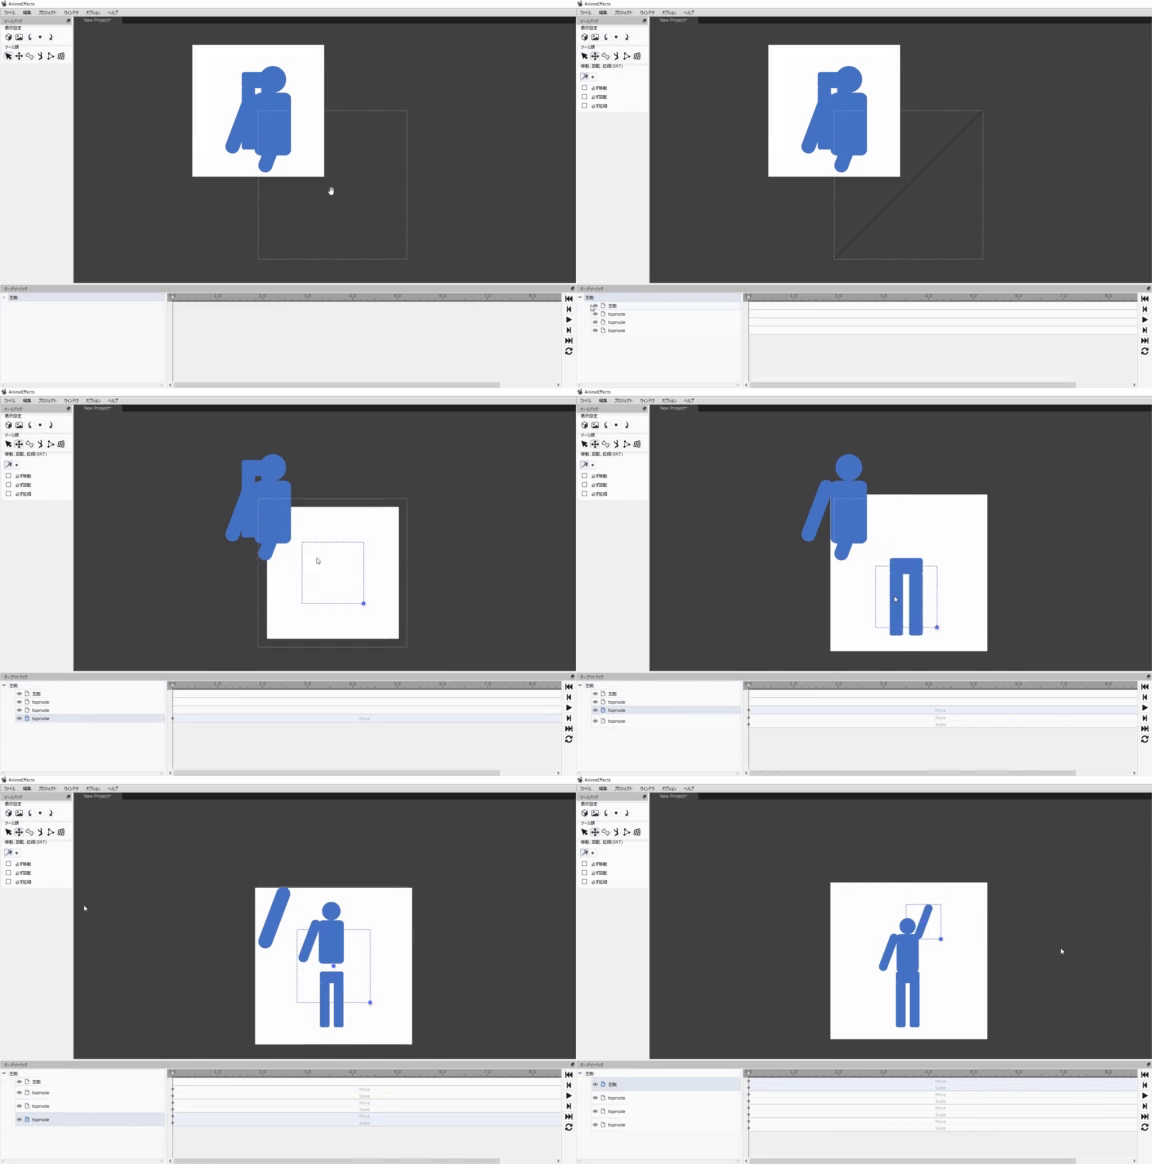
Arranging parts, judged by Move, rotate, scale and the Target Dock. It shows switching rows to move each piece. The move tool is boxed; left-arm and topnode rows are underlined.
Choose Move, rotate, scale, then pick a row in the Target Dock
Assembling the figure, judged by moving and scaling on the canvas. It shows matching position and size before the start pose. The blue person goes from stacked pieces to a standing figure.
Move and scale the parts into a standing figure
💡 Tip

The rows other than left-arm can stay named topnode. Selecting the row is enough for this method.

When the figure stands, use the same tool for the start pose — the beginning of the wave. Leave the timeline at 0 s.
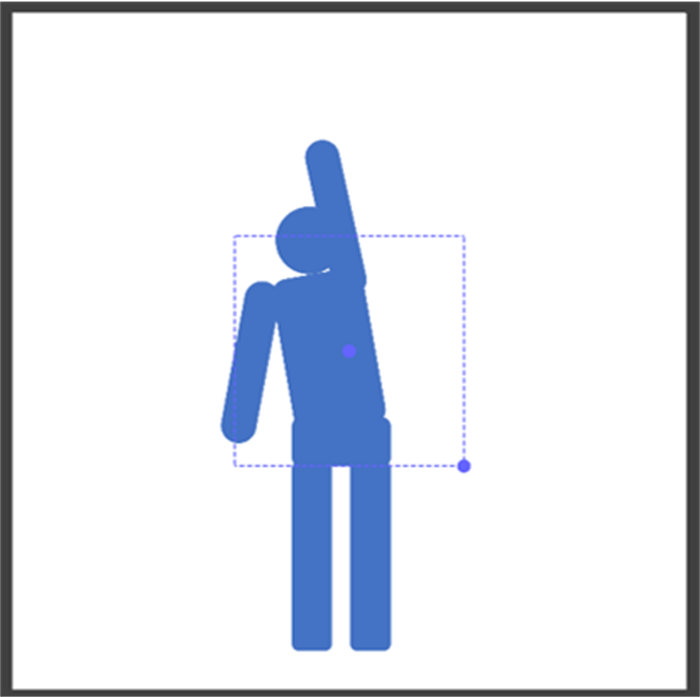
The start pose, judged by the timeline at 0 s. It shows the first key of the wave. One arm is up by the head; the other opens down; a selection box is on.
Start pose at 0 s. The arm that begins the wave

Put bones in the left arm and bend it

In the GIF at the top, the left arm bends at the elbow. The PNG is not sliding as a rigid piece. A bone pulls the pixels.

Turn on left-arm in the Target Dock, then choose Build bones in the Toolbox. With Add bones under that, click the shoulder, elbow, and wrist on the drawing.
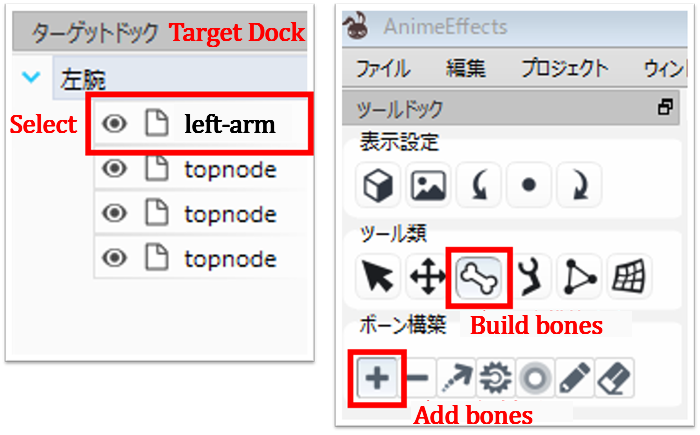
Bone tools, judged by selecting left-arm then Build bones and Add bones. It shows where to start the arm rig. Select, Build bones, and Add bones are boxed in red.
Select left-arm, then Build bones → Add bones
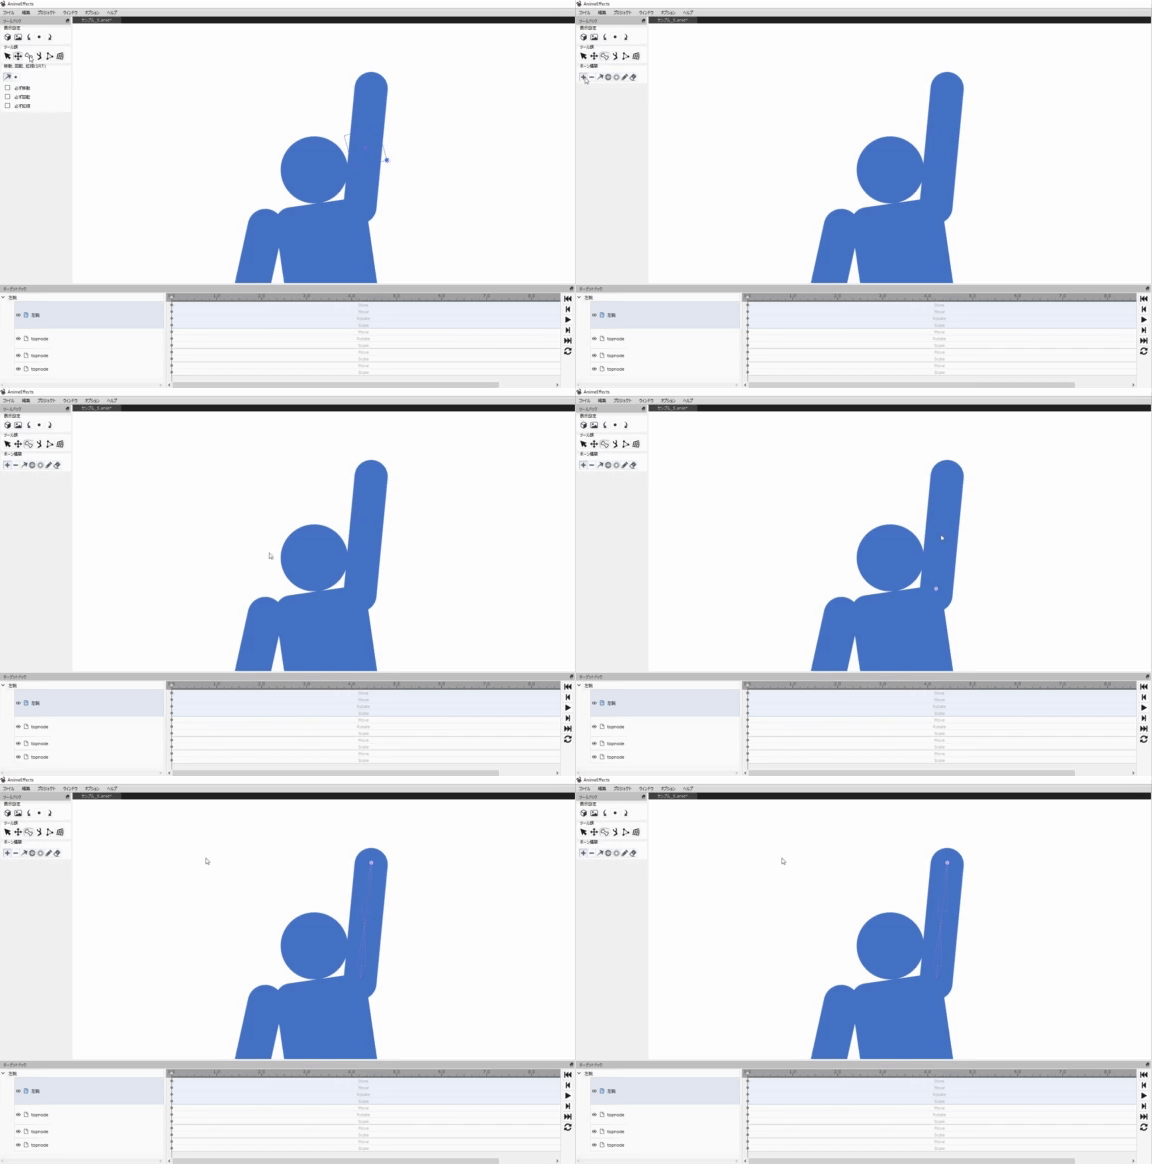
Placing bones, judged by clicks at shoulder, elbow, and wrist. It shows the order of the joints on one PNG. The GIF follows those three clicks on the blue left arm.
Click shoulder, elbow, then wrist

Clicks alone do not decide which pixels follow. Use Adjust influence (toward the right of Add bones) and widen the region from the chain. Too wide and the torso bends with the arm. Keep it on the arm pixels.
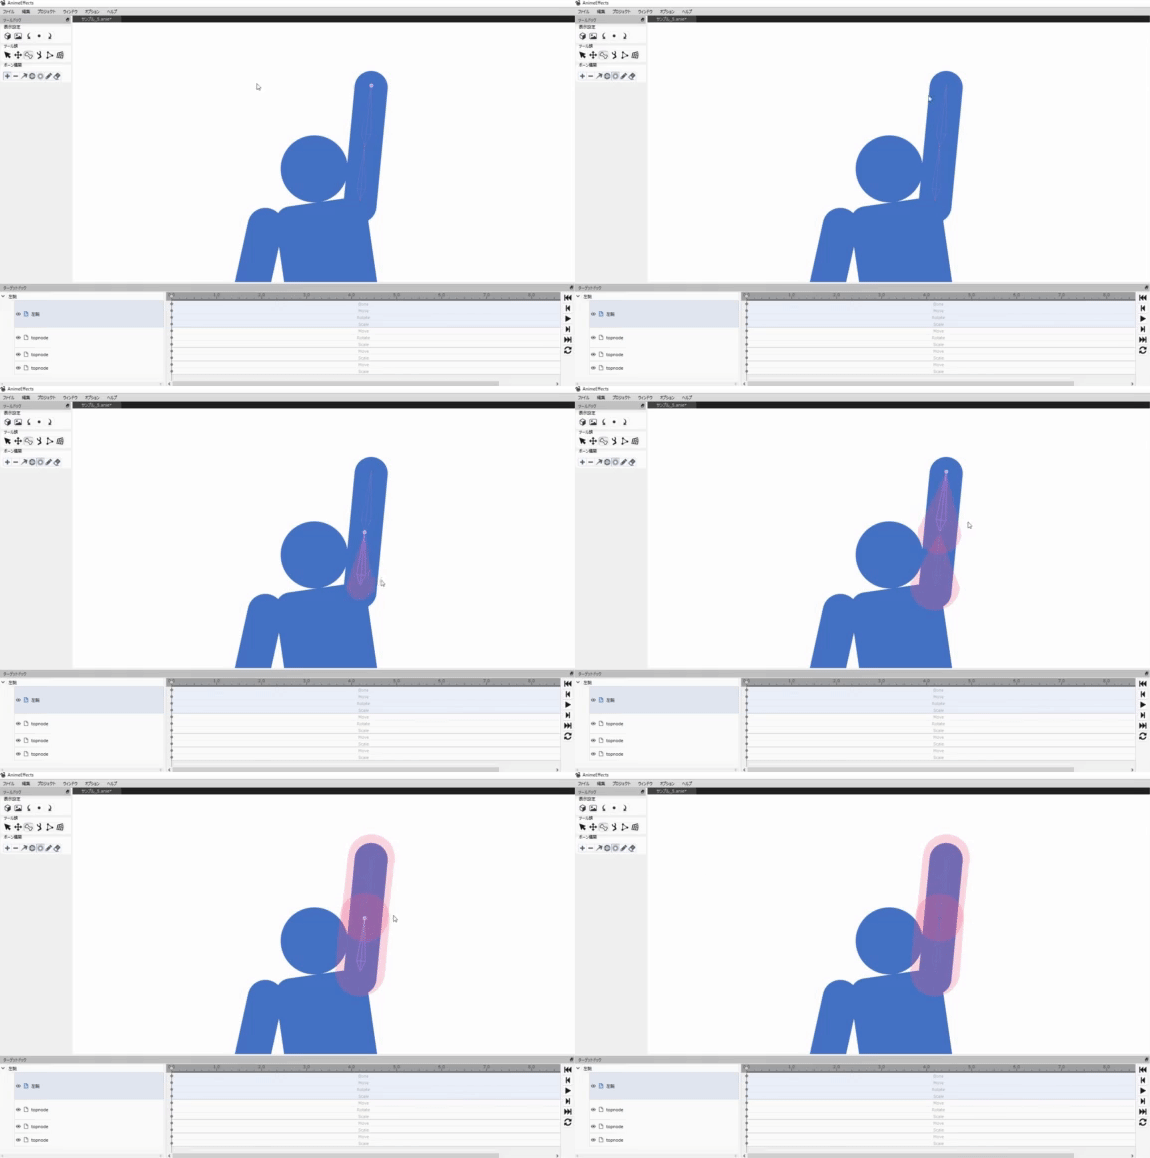
Bone influence, judged by expanding the region around the chain. It shows that only the arm pixels should follow. The GIF widens the influence over the left arm.
Widen the influence so only the arm pixels follow the bone

When the region is set, choose Pose bones in the Toolbox, then Move bone under it, and drag the wrist. The elbow folds into a wave close to the opening GIF.
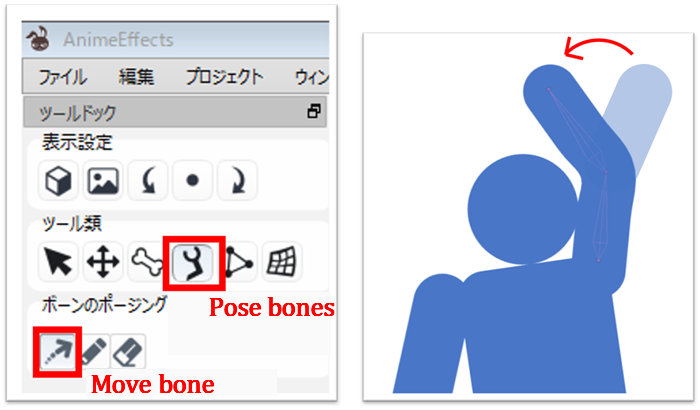
Posing the arm, judged by Pose bones and Move bone. It shows bending the elbow for the wave. The blue arm has a pink bone, a ghost pose, and a red motion arrow.
Pose bones, then Move bone to bend the elbow

Key the wave and set the length

This wave goes left → right → left on the screen. Drag the Target Dock playhead to 1.0 s and, the same way as the start pose, stretch the arm the other way.
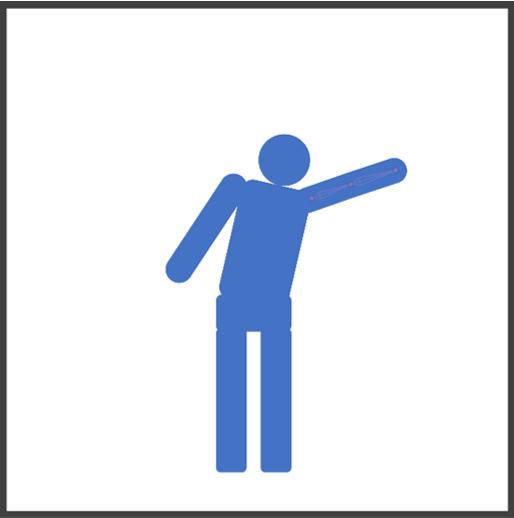
The mid pose, judged by 1.0 s with the arm the other way. It shows the far pose of the wave. The figure leans with the left arm out and pink bones in that arm.
1.0 s. The arm stretched the other way

The end pose matches the start, so you can copy it. In the Target Dock time-and-pose points, skip the top diamond, range-select the rest, copy, and paste under 2.0 s. If it lands off, range-select again and nudge the block.
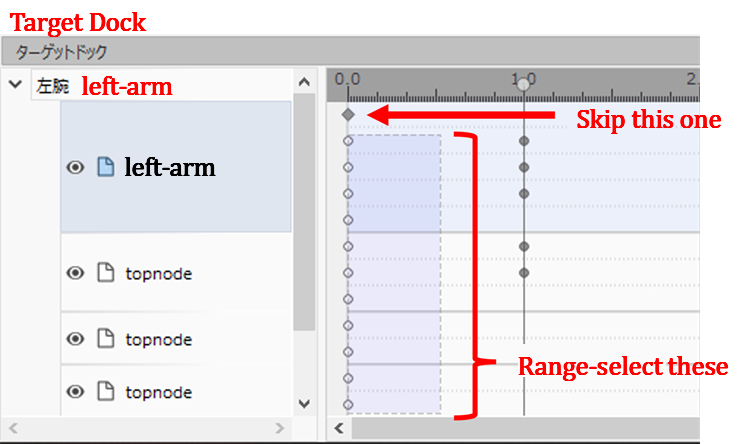
Copying keys, judged by which timeline marks to take. It shows skipping the top diamond and range-selecting the rest to paste at 2.0 s. Skip this one and Range-select these are marked.
Skip the top diamond, range-select the rest, paste at 2.0 s

Right after the paste, the arm may still be stretched. Compare it with the start pose and bend the bones again.

Clip length is ProjectMax frames. This example uses 120. On the timeline the wave is 0 s, 1 s, and 2 s.
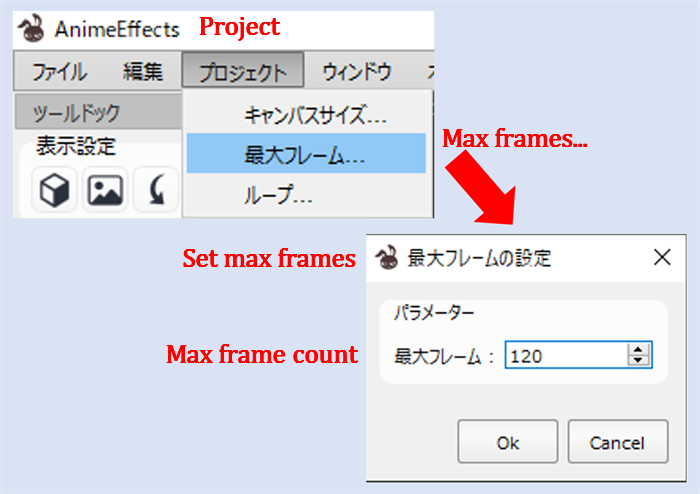
Max frame count, judged by Project then Max frames. It shows setting the clip to 120 frames. A red arrow runs from the menu to a dialog with Max frame count 120.
Project → Max frames… set to 120

Turn on Loop at the lower right, then Play. If it looks off, fix the keys or the bone bend.
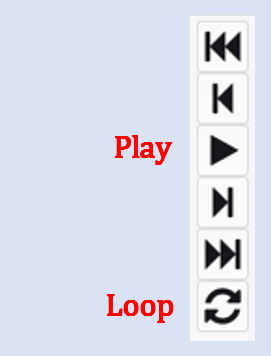
Playback controls, judged by Play and Loop. It shows looping before you judge the motion. Play and Loop sit in red beside the matching buttons on the transport strip.
Turn Loop on, then Play
The looped preview, judged as the same motion as the opening GIF. It shows checking the wave after the keys are in. The blue figure waves on a loop in the canvas.
Looped playback. Same motion as the GIF at the top

Export a GIF

File → Export AsGIF Animation, then choose where to save. The export dialog opens next. In that dialog, turn Optimize palette On.
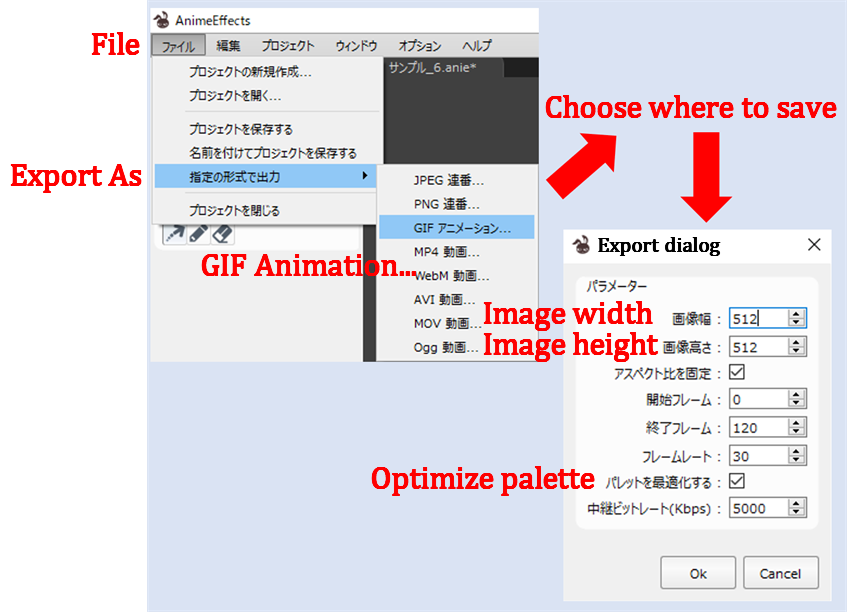
GIF export, judged by File, Export As, and GIF Animation. It shows turning on Optimize palette. Width and height are 512; frames run 0 to 120; Optimize palette is checked.
File → Export As → GIF Animation. Turn on Optimize palette

This example uses width and height 512, start frame 0, end frame 120.

⚠️ Common Pitfall

Check Optimize palette. Without it, the blue–white edge can noise. Flat fills with a hard edge show it more.

OK starts the encode. If the GIF matches the motion at the top, you are done. If only the export fails, the next section is for that.

If GIF export fails

If the bundled FFmpeg cannot write the file, take a prebuilt from the official site and put it next to AnimeEffects.exe. The page layout is still the one below.

Open FFmpeg – Download and follow the stills.
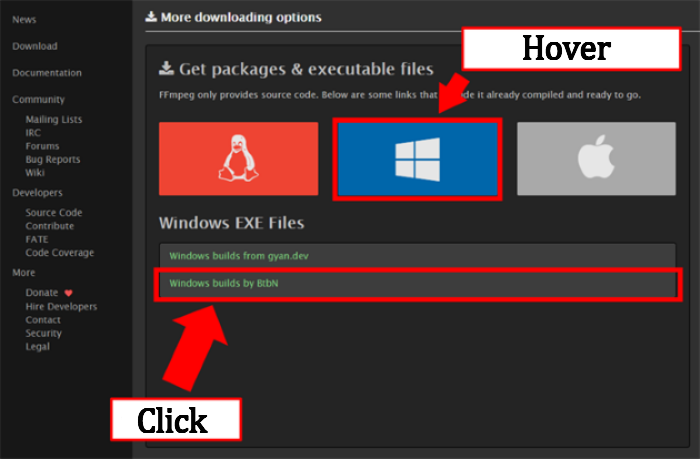
The FFmpeg download page, judged by the Windows executable links. It shows taking a prebuilt Windows zip, not the source. Windows is boxed, then Windows builds by BtbN, with Hover and Click notes.
ffmpeg.org. Hover Windows, then click Windows builds by BtbN

Hover Windows, then click Windows builds by BtbN. Pick a zip that matches your PC. In this example it is the red-lined row (the zip without shared). The filename and date are that build; you do not need the same one.
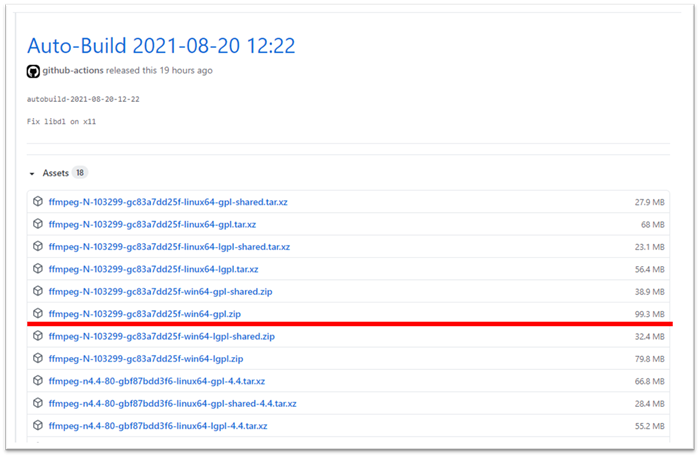
BtbN Windows zips, judged by which Assets row to pick. It shows taking a gpl zip without shared in the name. A red line sits under win64-gpl.zip; the date in the shot is that build.
The win64-gpl.zip without “shared” (the red line)

Unzip the archive whose name starts with ffmpeg. Inside is a bin folder. Copy its contents into a tools folder next to AnimeEffects.exe. Create tools if it is missing.
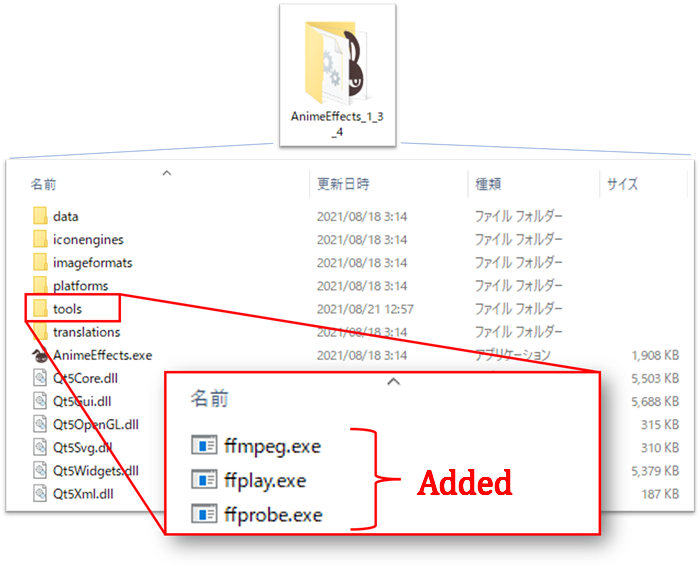
Where to put FFmpeg, judged by the tools folder next to AnimeEffects.exe. It shows the fallback copy if bundled FFmpeg fails. tools contains ffmpeg.exe, ffplay.exe, and ffprobe.exe, marked Added.
Copy bin into tools, next to AnimeEffects.exe

ffmpeg.exe is enough. Copying ffplay.exe and ffprobe.exe with it is fine.

AnimeEffects is software published by AnimeEffectsDevs. Microsoft PowerPoint® is a trademark of Microsoft Corporation. FFmpeg is a name of the FFmpeg project. The screenshots here are for explaining how to use the products. This site is not affiliated with, or endorsed by, those rights holders.

Comments

Leave a Reply

Your email address will not be published. Required fields are marked *